Buy a solar oven! I've searched to find the most cost effective way of cooking for single moms (and everyone else!). These are a good price & work really well! Email me for a flyer. I sell the SOS Sport & Global Sun solar ovens. Prices include shipping to your door. https://sites.google.com/site/singlemompreparedness/solar-ovens. Click on photo below to go to info/order page.
Showing posts with label Reviews. Show all posts
Tuesday, November 13, 2012
Solar oven turkey
So I decided to try turkey in my solar oven! I'd read that putting it breast down makes the white meat more juicy so I tried that. This is a photo of the turkey after about 4 hours. I was surprised that it browned & crisped!
This turkey was about 8 pounds. For some reason I was sure it would take all day. So I didn't even check it until after 4 hours. It was completely done. In fact I think I probably should have checked it an hour sooner.
The turkey tasted delicious! Just like in the oven at home. Complete success! It made me wonder; in a survival situation....there's all these geese around. Hhhmmm.....
Thursday, October 25, 2012
My favorite spice for potatoes
Now that you have all those potatoes to eat, you may want to buy some of this delicious spice. You can use it on many other things besides potatoes of course (like scrambled eggs!), but it's super yummy on potatoes. Anything I do with them, mashed, in stew, whatever, we use a liberal amount of this spice. I'd recommend buying the MSG free version. A great way to keep from getting sick of all those potatoes in your sawdust!
Tuesday, June 12, 2012
Foods without refrigeration
no fridge foods link
This is a very interesting article about keeping some foods fresh without refrigeration. I'm going to have to consider some of these! And I'll definitely be printing this off for if the day comes I don't have a fridge!
Thursday, June 7, 2012
Cold storage option
I've often wished I had a root cellar. I'd love a way to store my harvest all winter without refrigeration. But digging a whole root cellar is quite a daunting task! So I was quite interested in this idea of making a kind of small root cellar out of an old chest freezer. You could probably find a broken one free, since you won't need the motor. I'm wondering if a smaller cooler could work too....
http://www.windward.org/notes/notes70/lindsay7021.htm
Tuesday, June 5, 2012
Another test of my winter foam clothing!
I recently went goose hunting. It was early March in Northern Wyoming. We had to sit in a blind all day. That's me on the right, you can see my blue foam hat making me look like a smurf.
We were in the blind for about 7 hours total. The temps ranged from around 20 to 45. The winds got up to 45 mph, but we were largely sheltered from the wind. But with the wind chill it was about 9 when we got it.
Now I am a person who is always cold. If I get up in the night to use the bathroom, I'm shivering by the time I get there. If I sit at home & it's 69 in the house, I need a blanket. So I'm a good test subject! During the coldest part, I got slightly less than perfectly warm. (generating no warmth just sitting there!). But I never got "cold". Which to me was amazing! And during the warmer parts of the day I was quite toasty. On the walk out to the blind I was too hot! I know if I'd been wearing my normal winter gear, I would have sat there shivering for 7 hours (or given up & gone back to the car!). So this was really wonderful for me! The only part of me that got cold was my toes, & I only had my good winter boots on, without my foam in them. If you're moving around, you don't want to wear a windproof shell over the foam suit, as that ruins it's breathability. But since we had high winds & were just sitting, I did put on windbreaker pants & coat.
I was so excited about the results of this! And it sold the rest of my family on getting them a suit! They never see me warm! I still don't want to survive an entire winter in nothing but this suit...but if there's no heat for any length of time I'm going to be SO glad to have it! Not to mention I'm taking it next time I goose hunt, or ice climb or anything like that!!
Here's the original post about the suit for info on making one:
http://singlemompreparedness.blogspot.com/2012/02/warm-in-winter-foam-survival-clothing.html
We were in the blind for about 7 hours total. The temps ranged from around 20 to 45. The winds got up to 45 mph, but we were largely sheltered from the wind. But with the wind chill it was about 9 when we got it.
Now I am a person who is always cold. If I get up in the night to use the bathroom, I'm shivering by the time I get there. If I sit at home & it's 69 in the house, I need a blanket. So I'm a good test subject! During the coldest part, I got slightly less than perfectly warm. (generating no warmth just sitting there!). But I never got "cold". Which to me was amazing! And during the warmer parts of the day I was quite toasty. On the walk out to the blind I was too hot! I know if I'd been wearing my normal winter gear, I would have sat there shivering for 7 hours (or given up & gone back to the car!). So this was really wonderful for me! The only part of me that got cold was my toes, & I only had my good winter boots on, without my foam in them. If you're moving around, you don't want to wear a windproof shell over the foam suit, as that ruins it's breathability. But since we had high winds & were just sitting, I did put on windbreaker pants & coat.
I was so excited about the results of this! And it sold the rest of my family on getting them a suit! They never see me warm! I still don't want to survive an entire winter in nothing but this suit...but if there's no heat for any length of time I'm going to be SO glad to have it! Not to mention I'm taking it next time I goose hunt, or ice climb or anything like that!!
Here's the original post about the suit for info on making one:
http://singlemompreparedness.blogspot.com/2012/02/warm-in-winter-foam-survival-clothing.html
Thursday, May 31, 2012
Firestarter review!
I was given the awesome gift last Christmas of some firestarter. Here is the actual one I received Jim Baker firestarter, although this one at Emergency Essentials EE firestarter looks the same on the photo. But just to be clear, the Jim Baker one is the one I've tested.
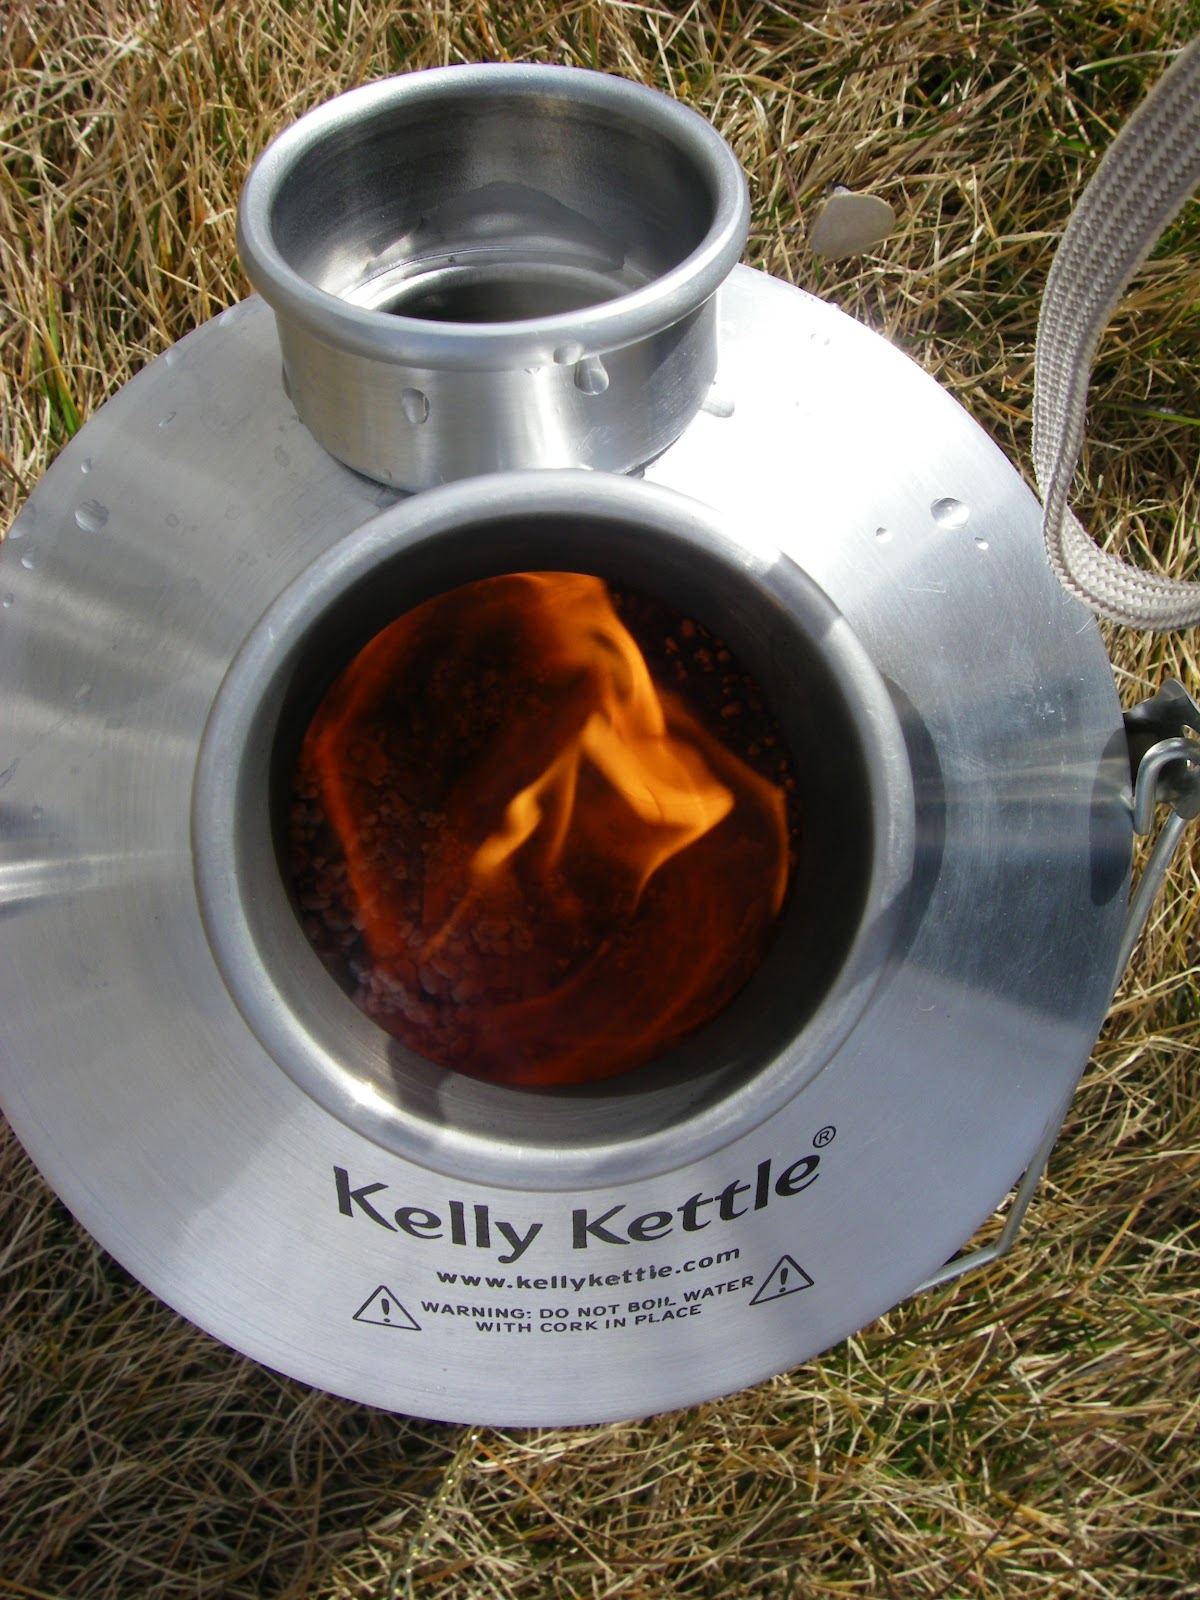
They claim this is coated to be is water resistant. I haven't tested this yet. It was a slightly breezy day & we had no trouble lighting it first try. The website claims it will burn in up to 30 mph winds (although I assume you'd have to start it out of the wind). I tested it first in my Kelly Kettle (see last blog post). It was perfect for that. It boiled the water quickly, & I didn't have to add more fuel. It also only took 1 match to light.
I had been told that you can put this out & relight it later. I liked that idea. The bucket says 1 cup will burn for 30 min, but if you can boil water in 6 min, I hate to waste all that other burning time. So after the water boiled, we smothered it out, & let it cool. (I estimate we were using about 2/3-3/4 cup of firestarter). We were able to get it relighted but it took a few matches this time. Perhaps sprinkling a bit of fresh on would help with that. It did relight burn longer, but it wasn't nearly as hot, & I didn't get my water to boil in the kettle this time. So I would probably try to do enough cooking to use it all, but if that wasn't possible, I would probably save it to combine with some fresh, & hopefully get more use out of it that way.
The wonderful woman who gave me the bucket full also gave me small packets with the instructions to put in my 72 hour backpacks. I thought that was a great idea! And you don't have to have a Kelly Kettle to use this, you can even cook right on top of it. It also has a 30 year shelf life! (Emergency Essentials also has smaller amounts if you don't want the huge bucket). This could also be used as kindling to get wood or other things started. Overall I'm VERY glad to have this in my storage!
One tiny complaint, the big bucket was VERY hard to open. I had to cut the "peel" part off the lid. And then use my tool for opening those buckets. I'd hate to be doing that in the cold or an emergency, so I'm glad I've already opened it once & got the hard part out of the way.
They claim this is coated to be is water resistant. I haven't tested this yet. It was a slightly breezy day & we had no trouble lighting it first try. The website claims it will burn in up to 30 mph winds (although I assume you'd have to start it out of the wind). I tested it first in my Kelly Kettle (see last blog post). It was perfect for that. It boiled the water quickly, & I didn't have to add more fuel. It also only took 1 match to light.
I had been told that you can put this out & relight it later. I liked that idea. The bucket says 1 cup will burn for 30 min, but if you can boil water in 6 min, I hate to waste all that other burning time. So after the water boiled, we smothered it out, & let it cool. (I estimate we were using about 2/3-3/4 cup of firestarter). We were able to get it relighted but it took a few matches this time. Perhaps sprinkling a bit of fresh on would help with that. It did relight burn longer, but it wasn't nearly as hot, & I didn't get my water to boil in the kettle this time. So I would probably try to do enough cooking to use it all, but if that wasn't possible, I would probably save it to combine with some fresh, & hopefully get more use out of it that way.
The wonderful woman who gave me the bucket full also gave me small packets with the instructions to put in my 72 hour backpacks. I thought that was a great idea! And you don't have to have a Kelly Kettle to use this, you can even cook right on top of it. It also has a 30 year shelf life! (Emergency Essentials also has smaller amounts if you don't want the huge bucket). This could also be used as kindling to get wood or other things started. Overall I'm VERY glad to have this in my storage!
One tiny complaint, the big bucket was VERY hard to open. I had to cut the "peel" part off the lid. And then use my tool for opening those buckets. I'd hate to be doing that in the cold or an emergency, so I'm glad I've already opened it once & got the hard part out of the way.
Tuesday, May 29, 2012
Kelly Kettle review
I was blessed to get in on a group buy of kelly kettles, & get a great deal! So I decided to give it a try. I love my solar oven, but I still wouldn't mind an option for cloudy days. What appealed to me about these is they are simple, & almost anything can be used for fuel. I'd even heard that dried animal droppings can be used. (makes sense, buffalo chips were used for fires). I have a lot of rabbit droppings, so that would be nice to have that option if necessary.
The kelly kettle holds the water all around the outside of the kettle. That makes it boil pretty fast with a smaller amount of fuel. You can add more fuel through the hole in the top while it's heating. And there is an optional stand & pot accessory (shown in the pic above).
I was pretty sure wood would burn (although you'd need small pieces), so I decided to try something else. We got long, dried pine needles that fall in our yard from our neighbors big tree. These burn hot & fast. I wasn't fast enough adding them at first, so had to restart the fire once. Shoving them in the top was a bit hot, so I got out my heat gloves I use for solar cooking Heat gloves post. These helped a lot. The needles worked great! We ended up using a pretty big pile of them, but did get the water to boil. And there are plenty of these around!
Next we tried rabbit droppings. We couldn't get them to light, so we tried adding some dryer lint as starter (see free fire starter post). The dryer lint lit right up, but didn't light the droppings. Then we tried with the needles, with same result. Our conclusion was that even though these were old droppings, they simply weren't dry enough to light. This summer I will experiment with really drying some & try again. I'd love to know if I had that fuel source.
Then we tried our firestarter. This was given to us as a Christmas present. firestarter link (this is what we have, but I believe emergency essentials carries the same thing in different packaging). Soon there was a vortex of flame inside the kelly kettle. It boiled the water in about 6 min, without our adding any more fuel.
Last we tried the little pot on top. A very small pot came with the stand, but you could use some larger pots or fry pans with the stand, you'd just have to experiment. But my once dislike of my solar oven is I can't fry anything. No scrambled eggs, cooking onions, browning beef. So I decided to try scrambling the egg. I put the pot on as soon as the water was boiling. I had a scrambled egg in no time at all!
In this pot, or a slightly larger one (I think a thin sided pot, such as are in camping sets would work better), you could cook rice or pasta.
Overall, I'm quite happy with my kelly kettle! It supplements my solar oven for cloudy days. Almost no matter the weather I could boil water, have hot chocolate, or make oatmeal, pasta or rice. And I can use it to fry which I can't my solar oven. Even better, I have much better options for fuel. I have some small camp stoves that use propane or other things; but the question always is how much fuel to store. We don't know how long we might need them. And the fuel is pricey. I love how fast, simple & versatile this is. The stand also goes flat & can store inside, & there's a storage bag for the whole thing. For more info you can look at their website http://www.kellykettle.com/. Maybe you can even set up a group buy to get a good deal like we did! The next post will have more on the firestarter. I think the firestarter is IDEAL for this kettle, if you want the easiest time. But I love all the other options this gives me. I'll be sure & post as I experiment with the manure later!
The kelly kettle holds the water all around the outside of the kettle. That makes it boil pretty fast with a smaller amount of fuel. You can add more fuel through the hole in the top while it's heating. And there is an optional stand & pot accessory (shown in the pic above).
I was pretty sure wood would burn (although you'd need small pieces), so I decided to try something else. We got long, dried pine needles that fall in our yard from our neighbors big tree. These burn hot & fast. I wasn't fast enough adding them at first, so had to restart the fire once. Shoving them in the top was a bit hot, so I got out my heat gloves I use for solar cooking Heat gloves post. These helped a lot. The needles worked great! We ended up using a pretty big pile of them, but did get the water to boil. And there are plenty of these around!
Next we tried rabbit droppings. We couldn't get them to light, so we tried adding some dryer lint as starter (see free fire starter post). The dryer lint lit right up, but didn't light the droppings. Then we tried with the needles, with same result. Our conclusion was that even though these were old droppings, they simply weren't dry enough to light. This summer I will experiment with really drying some & try again. I'd love to know if I had that fuel source.
Then we tried our firestarter. This was given to us as a Christmas present. firestarter link (this is what we have, but I believe emergency essentials carries the same thing in different packaging). Soon there was a vortex of flame inside the kelly kettle. It boiled the water in about 6 min, without our adding any more fuel.
Last we tried the little pot on top. A very small pot came with the stand, but you could use some larger pots or fry pans with the stand, you'd just have to experiment. But my once dislike of my solar oven is I can't fry anything. No scrambled eggs, cooking onions, browning beef. So I decided to try scrambling the egg. I put the pot on as soon as the water was boiling. I had a scrambled egg in no time at all!
In this pot, or a slightly larger one (I think a thin sided pot, such as are in camping sets would work better), you could cook rice or pasta.
Overall, I'm quite happy with my kelly kettle! It supplements my solar oven for cloudy days. Almost no matter the weather I could boil water, have hot chocolate, or make oatmeal, pasta or rice. And I can use it to fry which I can't my solar oven. Even better, I have much better options for fuel. I have some small camp stoves that use propane or other things; but the question always is how much fuel to store. We don't know how long we might need them. And the fuel is pricey. I love how fast, simple & versatile this is. The stand also goes flat & can store inside, & there's a storage bag for the whole thing. For more info you can look at their website http://www.kellykettle.com/. Maybe you can even set up a group buy to get a good deal like we did! The next post will have more on the firestarter. I think the firestarter is IDEAL for this kettle, if you want the easiest time. But I love all the other options this gives me. I'll be sure & post as I experiment with the manure later!
Thursday, May 24, 2012
Survival Medicine Handbook
I just finished reading this book cover to cover. One thing that is unique about this book over regular first aid books, is it is a book for if we are living in a collapse situation. It doesn't just tell you how to stabilize someone until you get them to a hospital, it assumes you are the only medical care available. That makes it much more useful in that kind of situation. Another thing I really liked about it is it gives information about traditional medical treatments, & herbal & alternative treatments. His contention is that you shouldn't rule out one or the other, but know both & use whatever you have. I am often frustrated with the way dr's & herbalists sometimes claim there to be nothing of value in the other, & have been wanting something that addresses both.
There is a lot of stuff in there. The chapters are short & concise. I can't think of anything I am likely to encounter that wasn't covered here.
He also has a lot of emphasis on prevention. For example safety glass when chopping wood, as trying to fix eye damage is not going to be easily done in a collapse situation. He also has a great method for stockpiling antibiotics, & instructions of when to use them. It covers everything from burns, childbirth, gall bladder attack, to ticks. I made a list in the back of things to buy after reading this book. It also made me realize the importance of getting as healthy as we can now...some things are just not going to be easily treatable without modern medicine.
He also has a list of youtube videos you can watch (now, not after a collapse) to learn some of the things talked about, as well as reference books he suggests you buy to keep. The author is a Dr, his wife is a nurse, they are both herbalists as well. One nice thing about this book is the "Doom & Bloom" title & philosophy. It's an attitude that you can "bloom" in hard situations, & is more optimistic & upbeat.
There were a few things I wish had more info. For instance it says dandelion tea for something, & I have no idea how to make that, so now I have to find another resource with that in it. However, the book is already 400 pages, so I can understand not being able to put everything in.
I'm very pleased with the book & think it would be a great thing for everyone to have. Now I just need to start working my way through those youtube vidoes, & buying my list of additional supplies! While I won't remember everything I read of course, I'm hoping in an emergency enough will stick with me to help, at least enough until I can look things up in this book!
Tuesday, May 1, 2012
Medical care during emergencies & collapses! CD review
I just finished going through this CD I picked up at a prep fair. I played it on my computer & it was about an hour & 15 min. It is audio with slides. The first half I was a bit bored. For instance I didn't need 10 min to convince me I needed to learn some medical skills, that was why I bought it! (although they had some good stats) It was pretty basic at first. So I was still bored for a while. For instance I already know elderberry is on the list that can help with illness, & since there was no info on how to use it, I didn't need to hear that again. But as it went, it got better & better. It had some interesting emergency dental info, including specific products to buy. Tools needed for extractions were shown, although no instruction of how to do so was given. Then it got into different kinds of injuries, 3 degrees of burns, different kinds of broken bones, & how to treat them all. Hypothermia & heat stroke are on here too. As are specific product recommendations for your first aid kit (I've got a big list to buy now!). I thought how to tell when to stitch a wound & when not to was great info. And I'd never heard of surgical staples instead of stitches! As it got to more specific info I wasn't familiar with I really enjoyed it, making notes as I went along. One thing I especially liked about this is it was from the perspective of if getting to a hospital isn't possible at all. Such as in a major disaster when hospitals are overwhelmed, or you can't travel. Or longer term scenarios. So the point of view was entirely taking care of things yourself, rather than emergency stop gaps until you get to a Dr.
The man is a Dr, & his wife is a nurse. I liked that they included traditional medical items, as well as natural & herbal ones. I learned some cool things about honey in wounds. And their idea of how to stockpile medicines (especially a cheap, legal way to get antibiotics) was worth the cost of the CD all by itself!
http://store.doomandbloom.net/products/collapse-medicine-dvd.html
Here is where you can buy the CD. They have a book out now I plan to order & will review after I go through it. And they have some videos free on youtube under DrBonespodcast. Their website also has many free articles.
http://www.doomandbloom.net/
The man is a Dr, & his wife is a nurse. I liked that they included traditional medical items, as well as natural & herbal ones. I learned some cool things about honey in wounds. And their idea of how to stockpile medicines (especially a cheap, legal way to get antibiotics) was worth the cost of the CD all by itself!
http://store.doomandbloom.net/products/collapse-medicine-dvd.html
Here is where you can buy the CD. They have a book out now I plan to order & will review after I go through it. And they have some videos free on youtube under DrBonespodcast. Their website also has many free articles.
http://www.doomandbloom.net/
Wednesday, April 4, 2012
couponchief.com review
In case you don't know yet, I love using coupons. It has allowed me to do far more on my preparedness than I could without. So I was interested in a site I hadn't used before called http://www.couponchief.com/.
The first thing to know is this is an online coupon site. It's mostly not for printing coupons, although there are a few of those. I often buy prep things online, especially if I can get a good deal. After all, what's easier than spending 5 min ordering online & having your prep items brought right to your door? And if you can get free shipping, even better.
When ordering online I usually do a google search for coupons for that retailer before I order. Usually I can find a coupon code, but sometimes it takes a while searching through various sites. From now on I'll check couponchief first. They have a lot of coupons listed, & what's nice is the info that tells you if the coupon is working. It may say "submitter certifiied", meaning the person who submitted it already used it, or say something like 84% success rate. If you've ever tried online coupon after coupon, with them not working because the site didn't have an expiration on the coupon, you'll know how useful this is. There is also a thing to click after you use it to tell if it worked or not, to keep it accurate.
Using the codes is simple. You click on "show & use" & it takes you directly to the company website. The code is automatically put onto your clipboard, so in checkout you can just "paste" it into the coupon box.
Another feature of the site I'd personally never seen before was users submitting coupons. You can register on the site, & then put coupon codes on & get paid a small percentage when anyone makes a purchase with your coupon code. I often receive coupon codes in emails so I gave this a try. The first link I tried to register with allowed me to enter my info, but I couldn't find a "submit" or "continue" button. I had to try a different link on a different page. After that submitting a coupon was easy. It took me very little time. Some people had submitted a lot of coupons! I put several in for the website artscow; while they had a lot of coupons for them, I had at least 3 I'd gotten in emails recently that weren't on there. So the coupons list doesn't have every coupon code out there.
There were a LOT of stores on there. The list was huge, & I looked for every online store I could think of I buy from. They were all there. The search function for stores worked well & was simple to use.
If you haven't been using online coupons, do! Usually you can get free shipping, 20% off, or free items. If you're buying it anyway you may as well save. And trying couponchief.com first is a great place to start!
The first thing to know is this is an online coupon site. It's mostly not for printing coupons, although there are a few of those. I often buy prep things online, especially if I can get a good deal. After all, what's easier than spending 5 min ordering online & having your prep items brought right to your door? And if you can get free shipping, even better.
When ordering online I usually do a google search for coupons for that retailer before I order. Usually I can find a coupon code, but sometimes it takes a while searching through various sites. From now on I'll check couponchief first. They have a lot of coupons listed, & what's nice is the info that tells you if the coupon is working. It may say "submitter certifiied", meaning the person who submitted it already used it, or say something like 84% success rate. If you've ever tried online coupon after coupon, with them not working because the site didn't have an expiration on the coupon, you'll know how useful this is. There is also a thing to click after you use it to tell if it worked or not, to keep it accurate.
Using the codes is simple. You click on "show & use" & it takes you directly to the company website. The code is automatically put onto your clipboard, so in checkout you can just "paste" it into the coupon box.
Another feature of the site I'd personally never seen before was users submitting coupons. You can register on the site, & then put coupon codes on & get paid a small percentage when anyone makes a purchase with your coupon code. I often receive coupon codes in emails so I gave this a try. The first link I tried to register with allowed me to enter my info, but I couldn't find a "submit" or "continue" button. I had to try a different link on a different page. After that submitting a coupon was easy. It took me very little time. Some people had submitted a lot of coupons! I put several in for the website artscow; while they had a lot of coupons for them, I had at least 3 I'd gotten in emails recently that weren't on there. So the coupons list doesn't have every coupon code out there.
There were a LOT of stores on there. The list was huge, & I looked for every online store I could think of I buy from. They were all there. The search function for stores worked well & was simple to use.
If you haven't been using online coupons, do! Usually you can get free shipping, 20% off, or free items. If you're buying it anyway you may as well save. And trying couponchief.com first is a great place to start!
Friday, March 30, 2012
Zaycon deal on ground beef!
Zaycon foods is having a deal on very lean ground beef. This is lean enough to can. Besides it being great in our food storage, I love having ground beef already cooked to throw in spaghetti, tacos, etc. Such a time saver! And canning it is easy! I also love how easy it is to get the meat from Zaycon, you just "drive up" & they put it in your car!
http://www.zayconfoods.com/ refer/zf76778
http://www.zayconfoods.com/
Thursday, March 22, 2012
Putting your food storage in #10 cans at home
Have you sealed any of your food storage in #10 cans? If not, here's some information!
One way to do it is make an appointment at an LDS cannery (you don't have to be LDS), buy bulk food there, & can it there. It is non-profit & they have a some great basic food items. Here's a current price list:
http://www.providentliving.org/pfw/multimedia/files/pfw/pdf/123141_HSC_OrderFormUS_EngNov2011_pdf.pdf
The other thing you can do is "check out" the can sealer for a few days & seal cans at home. This is what I've been doing once a year. I let family & friends know too, & they schedule a time to come seal their cans while I've got it. The cans with a lid & oxygen pack come out to about $1 each. The cannery can help you figure out how many cans you need for what you have, but an example is, 5-6 cans for 25 lbs of flour. I do it at home because I can work for a few hours, stop & then do more. I can also put in things I've bought myself out side the cannery (the cannery can't let you bring in outside food because of government health regulations). So I can put in the chocolate I bought on clearance, or our favorite noodles, or what have you. It also is easier to get friends & family to participate if I have the cans for them & they just have to come over to my house. They will show you how to seal the cans when you check it out. It's not hard, my 8 year old sealed all our cans last time, & loved doing it.
I had some friends who were just starting on their prep efforts. In all they spend around $100 on the cans & things like flour & rice from Costco. When they plugged what they had into Emergency Essentials food storage calculator, they were excited to find out they had 3 months worth of food! It took them about an hour to can it all. Now that flour & rice will keep for around 30 years, in earthquake proof cans!
I collect food on sales, etc all year, & then get the canner once a year.
A couple of tips: sugar doesn't need oxygen packs in. Salt doesn't have to be preserved in cans, it's a preservative itself. And be sure & "shake" the cans after you fill it. The food will settle in & leave you a lot more room at the top to put more in. This is especially true of flour.
So start getting food before prices go up more & then go get some cans!!
One way to do it is make an appointment at an LDS cannery (you don't have to be LDS), buy bulk food there, & can it there. It is non-profit & they have a some great basic food items. Here's a current price list:
http://www.providentliving.org/pfw/multimedia/files/pfw/pdf/123141_HSC_OrderFormUS_EngNov2011_pdf.pdf
The other thing you can do is "check out" the can sealer for a few days & seal cans at home. This is what I've been doing once a year. I let family & friends know too, & they schedule a time to come seal their cans while I've got it. The cans with a lid & oxygen pack come out to about $1 each. The cannery can help you figure out how many cans you need for what you have, but an example is, 5-6 cans for 25 lbs of flour. I do it at home because I can work for a few hours, stop & then do more. I can also put in things I've bought myself out side the cannery (the cannery can't let you bring in outside food because of government health regulations). So I can put in the chocolate I bought on clearance, or our favorite noodles, or what have you. It also is easier to get friends & family to participate if I have the cans for them & they just have to come over to my house. They will show you how to seal the cans when you check it out. It's not hard, my 8 year old sealed all our cans last time, & loved doing it.
I had some friends who were just starting on their prep efforts. In all they spend around $100 on the cans & things like flour & rice from Costco. When they plugged what they had into Emergency Essentials food storage calculator, they were excited to find out they had 3 months worth of food! It took them about an hour to can it all. Now that flour & rice will keep for around 30 years, in earthquake proof cans!
I collect food on sales, etc all year, & then get the canner once a year.
A couple of tips: sugar doesn't need oxygen packs in. Salt doesn't have to be preserved in cans, it's a preservative itself. And be sure & "shake" the cans after you fill it. The food will settle in & leave you a lot more room at the top to put more in. This is especially true of flour.
So start getting food before prices go up more & then go get some cans!!
Tuesday, March 13, 2012
Earthquake help for your canning jars
Here are the tips I learned for your canning jars at a recent earthquake safety class:
Put them on the bottom shelf.
Have the shelves secured to the wall.
Put cardboard in between all the jars. The canning jars I used to get already that that, but I often threw those away. My recent purchases don't have that anymore. She said that having cardboard between will really help reduce jar breakage when they are shaking. So I've started saving empty cereal boxes & cutting them up. 1 cereal box does 1 box of jars. It's quite easy to put these in after the jars are cool. But it's going to take me a while to get enough empty boxes to do all the jars I already have canned! I'm going to work on this though. Besides loosing the food, the clean up would be terrible! Obviously, if this is a big enough quake to destroy your home, this won't help. But smaller earthquakes, this can be a big help!
Put them on the bottom shelf.
Have the shelves secured to the wall.
Put cardboard in between all the jars. The canning jars I used to get already that that, but I often threw those away. My recent purchases don't have that anymore. She said that having cardboard between will really help reduce jar breakage when they are shaking. So I've started saving empty cereal boxes & cutting them up. 1 cereal box does 1 box of jars. It's quite easy to put these in after the jars are cool. But it's going to take me a while to get enough empty boxes to do all the jars I already have canned! I'm going to work on this though. Besides loosing the food, the clean up would be terrible! Obviously, if this is a big enough quake to destroy your home, this won't help. But smaller earthquakes, this can be a big help!
Tuesday, March 6, 2012
Earthquake straps for water heater
I recently attended an earthquake safety meeting given by the Dept Homeland Security. One thing she stressed was earthquake straps for your water heater. I know people in California have these. I live in Utah where earthquakes are a risk too, but I'd never heard of them. She said that the most common reason you have to turn of your gas is because the water heater tips over & breaks the gas line. I looked online when I got home, & you can get these for under $20!
Something so simple & inexpensive, that can save so much expense later! Not to mention the safety issues of a broken gas line! I bought some, & a friend installed them for me. I feel such peace of mind knowing it's done!
Thursday, February 23, 2012
Heat packs-another cheap way to keep warm
My father taught me a wonderful trick with those heat packs that are to warm your hands. Knowing this has allowed always cold me to go ice climbing & camping without shivering for hours!
Activate the heat pack, & put 2 sided tape on it. Put one in each under arm. Having heat there stimulates blood vessels, & helps you generate body heat. This is awesome since sometimes I think I don't generate any body heat myself. Just putting them on your hands gets them warmer where the pad is touching, but putting them under your arms helps all over.
A couple safety notes: putting them on your skin may cause burns. Ideally a thin layer of clothing between the pad & your skin is wanted. I don't always have this, & did get burned once.
Also, don't use duct tape to attach it if you can help it! Very hard to get the pads off, & it leaves a lot of residue!
We've also considered sewing pockets into a warm shirt to hold these.
Now this is cheap & effective! Usually the pads stay warm for about 6 hours. When I've slept with them, even after they run out, by then the sleeping bag is warm & so I'm warm while I'm in the bag. Now it would be hard to store enough for an entire winter, but I do have a pile of these around for a short term emergency. Not to mention all my cold outdoor outings! Or for prep storage, there are some with longer warming time; up to 20 hours.
Activate the heat pack, & put 2 sided tape on it. Put one in each under arm. Having heat there stimulates blood vessels, & helps you generate body heat. This is awesome since sometimes I think I don't generate any body heat myself. Just putting them on your hands gets them warmer where the pad is touching, but putting them under your arms helps all over.
A couple safety notes: putting them on your skin may cause burns. Ideally a thin layer of clothing between the pad & your skin is wanted. I don't always have this, & did get burned once.
Also, don't use duct tape to attach it if you can help it! Very hard to get the pads off, & it leaves a lot of residue!
We've also considered sewing pockets into a warm shirt to hold these.
Now this is cheap & effective! Usually the pads stay warm for about 6 hours. When I've slept with them, even after they run out, by then the sleeping bag is warm & so I'm warm while I'm in the bag. Now it would be hard to store enough for an entire winter, but I do have a pile of these around for a short term emergency. Not to mention all my cold outdoor outings! Or for prep storage, there are some with longer warming time; up to 20 hours.
Tuesday, February 21, 2012
Zaycon foods review
Zaycon foods link
I recently tried ordering from Zaycon foods. I'd often seen info about getting chicken there, but as it wasn't any cheaper than what I'd been getting on sale at the grocery store, I'd kind of ignored it. (Since then I've been told by friends that Zaycon's is way tastier than the grocery store).
But then they had a really great deal on ground beef. You have to have 90% lean or leaner to can ground beef. And it's rarely on sale for cheap enough to can a lot of it. And it's never in 40 lb boxes like chicken. So when Zaycon had it for $2.89 lb at 90% lean, I ordered a 40 lb box. The instructions were to pick it up during certain hours at a local bowling alley. I was picturing mayhem, lots of people, me trying to carry a 40 lb box. But I was impressed with how quick & easy it was to pick up. They had a truck full of the beef, & cones to direct your car. You drive up, the mark your name, put your box in for you, & you're gone! Super fast! The beef came in 2 long packages, & it wasn't frozen so I could can it right away. I got around 1 lb in each pint jar. The other times I'd done beef, I'd browned it first to get rid of some of the grease. This time I raw packed it, as browning it all would about triple the time & work. Everything went great! The beef is super tasty (we used some fresh for dinner too). It was a great price & easy to pick up! I will definitely be ordering from them again! Might even try the chicken!
Right now they are taking orders for bacon, seafood, chicken & beef (availability depending on where you live).
zaycon foods link
Get on their site & sign up for the notification list so you have an option to order when some is coming near you!
I recently tried ordering from Zaycon foods. I'd often seen info about getting chicken there, but as it wasn't any cheaper than what I'd been getting on sale at the grocery store, I'd kind of ignored it. (Since then I've been told by friends that Zaycon's is way tastier than the grocery store).
But then they had a really great deal on ground beef. You have to have 90% lean or leaner to can ground beef. And it's rarely on sale for cheap enough to can a lot of it. And it's never in 40 lb boxes like chicken. So when Zaycon had it for $2.89 lb at 90% lean, I ordered a 40 lb box. The instructions were to pick it up during certain hours at a local bowling alley. I was picturing mayhem, lots of people, me trying to carry a 40 lb box. But I was impressed with how quick & easy it was to pick up. They had a truck full of the beef, & cones to direct your car. You drive up, the mark your name, put your box in for you, & you're gone! Super fast! The beef came in 2 long packages, & it wasn't frozen so I could can it right away. I got around 1 lb in each pint jar. The other times I'd done beef, I'd browned it first to get rid of some of the grease. This time I raw packed it, as browning it all would about triple the time & work. Everything went great! The beef is super tasty (we used some fresh for dinner too). It was a great price & easy to pick up! I will definitely be ordering from them again! Might even try the chicken!
Right now they are taking orders for bacon, seafood, chicken & beef (availability depending on where you live).
zaycon foods link
Get on their site & sign up for the notification list so you have an option to order when some is coming near you!
Tuesday, February 14, 2012
Warm in winter-foam survival clothing!
One thing that has constantly worried me about my prep efforts is keeping warm in the winter. I am one of those people who are always cold! I sometimes start shivering on my way to the bathroom in the middle of the night! My home doesn't have a fireplace...I've thought of putting one in, but you also have to store enough wood. Propane heaters are great for a few days. But I've always wanted something for if I had to go longer without heat. I know some people in the US were without power for weeks last winter...and that was just for a localized natural disaster.
So I decided to look into these foam winter survival suits designed by Jim Phillips. His clothing has been used in the Iditarod, North Pole expeditions & by the military. The foam is very breathable...you don't wear anything water proof over it. Your body heat alone will dry it out & keep you warm. You can buy the materials to make a full suit for around $100. Now that sounds pricey...but start adding up the cost of your snow pants, coat, shell, hat, gloves, etc. Or compare to the cost of putting in a fireplace, or a year worth of propane. As an added bonus, you can use these anywhere. If you have to evacuate, or even live outside, you could still use these. To me that's a big plus.
Now my understanding is you have to have a stronger sewing machine to sew on the foam. Additionally, I don't know how to sew. So I paid someone to make the suit for me. Stylish it is not. But is it warm?
The first time I tested it, I wore it to an outing my son had outside. It was sunny & about 37 degrees. Soon I was HOT. Good sign for someone who's always cold! Next I tested it outside in the dark when it was about 21 degrees. I could tell it was a lot warmer than my regular winter gear. I stayed comfortable & toasty! And that's saying a lot considering how cold I usually am! They are also a lot more comfortable than I feared. I was picturing a wet suit like feel. But it's quite flexible & not uncomfy. You can also wear clothing over the top (although not something waterproof, that stops the "breathing" capability). This would be an especially good idea if you were evacuating so others wouldn't know you had the clothes & want to steal them.
I am now having an outfit made for my son. With him we are making the arms & legs longer, & making it just a bit bigger around than he is. I'm hoping in this way to have it "fit" for a few years. Then I will pass it on to younger cousins. I will probably keep some foam & a pattern on hand as well. Worse case we could sew one by hand if necessary. Then I'll have to make him a new one every few years.
Ok, this still wouldn't be my first choice for a whole winter! I don't WANT to have a winter without heat! But so far this is the most versatile heating method I've found. It would help in almost any situation, & it's actually affordable.
Any search online for "foam winter clothing" or "Jim Phillps" will help you find more information. Many people do group buys on the foam to get a better price. Here's a few websites with info to get started:
http://www.jimsway.com/atjs1.html
http://www.motherearthnews.com/Do-It-Yourself/1985-01-01/Make-Your-Own-Cold-Weather-Clothing.aspx
http://squattheplanet.com/threads/diy-polyurethane-foam-winter-clothing.7705/
So I decided to look into these foam winter survival suits designed by Jim Phillips. His clothing has been used in the Iditarod, North Pole expeditions & by the military. The foam is very breathable...you don't wear anything water proof over it. Your body heat alone will dry it out & keep you warm. You can buy the materials to make a full suit for around $100. Now that sounds pricey...but start adding up the cost of your snow pants, coat, shell, hat, gloves, etc. Or compare to the cost of putting in a fireplace, or a year worth of propane. As an added bonus, you can use these anywhere. If you have to evacuate, or even live outside, you could still use these. To me that's a big plus.
Now my understanding is you have to have a stronger sewing machine to sew on the foam. Additionally, I don't know how to sew. So I paid someone to make the suit for me. Stylish it is not. But is it warm?
The first time I tested it, I wore it to an outing my son had outside. It was sunny & about 37 degrees. Soon I was HOT. Good sign for someone who's always cold! Next I tested it outside in the dark when it was about 21 degrees. I could tell it was a lot warmer than my regular winter gear. I stayed comfortable & toasty! And that's saying a lot considering how cold I usually am! They are also a lot more comfortable than I feared. I was picturing a wet suit like feel. But it's quite flexible & not uncomfy. You can also wear clothing over the top (although not something waterproof, that stops the "breathing" capability). This would be an especially good idea if you were evacuating so others wouldn't know you had the clothes & want to steal them.
I am now having an outfit made for my son. With him we are making the arms & legs longer, & making it just a bit bigger around than he is. I'm hoping in this way to have it "fit" for a few years. Then I will pass it on to younger cousins. I will probably keep some foam & a pattern on hand as well. Worse case we could sew one by hand if necessary. Then I'll have to make him a new one every few years.
Ok, this still wouldn't be my first choice for a whole winter! I don't WANT to have a winter without heat! But so far this is the most versatile heating method I've found. It would help in almost any situation, & it's actually affordable.
Any search online for "foam winter clothing" or "Jim Phillps" will help you find more information. Many people do group buys on the foam to get a better price. Here's a few websites with info to get started:
http://www.jimsway.com/atjs1.html
http://www.motherearthnews.com/Do-It-Yourself/1985-01-01/Make-Your-Own-Cold-Weather-Clothing.aspx
http://squattheplanet.com/threads/diy-polyurethane-foam-winter-clothing.7705/
Thursday, February 9, 2012
Volcano grill review
http://www.volcanogrills.com/
My brother recently bought one of these grills. He liked the idea of being able to cook with wood, propane or charcoal. But after thinking about it, he decided against storing a lot of propane. It's expensive, & not really safe to store. So he got a lot of charcoal. The first thing he noticed is it didn't collapse down as easily as on the website. It was kind of frustrating. Then he tried cooking with it. He said it took a lot more charcoal than he thought it should, & that it cooked really slowly. So he started to wonder...if using charcoal or wood, is this stove he paid over $100 for, really any better than a cheap grill? So the next time he was making hamburgers; he bought a $5 grill,& cooked on them both at the same time to compare. His result? No difference. If you're really wanting to use propane, this may still be a great choice for you. But my brother is now trying to sell his.
Tuesday, January 24, 2012
Cool survival book!
I bought this book for $10 at Recreation Outlet & picked up another for a Christmas present. Now that I've had time to look through it, I wish I'd bought more at that price! This is a very comprehensive guide. It has photos with all the instructions, which I much prefer over vague drawings. It covers wilderness & urban areas. The sections are Bushcraft, Shelter, Fire, Water, Food, Tools, Self defense urban, home survival, surviving on the move, surviving terrorism, surviving nature, first aid. Lots of it you could save for reference (such as tanning a hide, building an igloo), & others you'd want to learn ahead of time (such as self defense, securing your home, how to escape when bound). This book was WELL worth the price!!
Thursday, January 12, 2012
Great deal on Tattler reusable canning lids!
You can see my original post on these lids at
http://singlemompreparedness.blogspot.com/2011/07/reusable-canning-lids.html
For the next 3 days at http://www.markdown.com/ you can get a package with 100 regular mouth rings & lids, & 100 wide mouth rings & lids for $85.75, & the price includes shipping. This is a 40% discount & a great way to try out these lids! And you can purchase up to 5 packages a person.
Here's their instructions on using them:
http://www.reusablecanninglids.com/howtheywork.aspx
http://singlemompreparedness.blogspot.com/2011/07/reusable-canning-lids.html
For the next 3 days at http://www.markdown.com/ you can get a package with 100 regular mouth rings & lids, & 100 wide mouth rings & lids for $85.75, & the price includes shipping. This is a 40% discount & a great way to try out these lids! And you can purchase up to 5 packages a person.
Here's their instructions on using them:
http://www.reusablecanninglids.com/howtheywork.aspx
Subscribe to:
Posts (Atom)